Honda
How to Replace Brake Pads on Honda Accord (2008-2018): A Step-by-Step Guide

If you own a Honda Accord (2008-2018), replacing the brake pads is a vital part of your vehicle’s maintenance. Brake pads wear down over time and need to be replaced to ensure your vehicle’s safety and optimal performance.
In this article, we will provide you with a step-by-step guide on how to replace the brake pads on your Honda Accord (2008-2018). From identifying when it’s time to replace your brake pads to tips for extending their life, we’ll cover all the essential information you need to know to keep your Honda Accord running smoothly and safely.
How to Identify When Your Honda Accord (2008-2018) Brake Pads Need Replacing
Your Honda Accord’s brake pads are a vital component in ensuring your safety on the road. As you use your brakes, the friction between the pads and the rotors causes them to wear down over time. It’s important to be aware of the signs that your Honda Accord’s brake pads need replacing, as driving with worn brake pads can be dangerous and can cause damage to your vehicle’s brake system. Here are some signs that indicate it’s time to replace your Honda Accord’s brake pads:
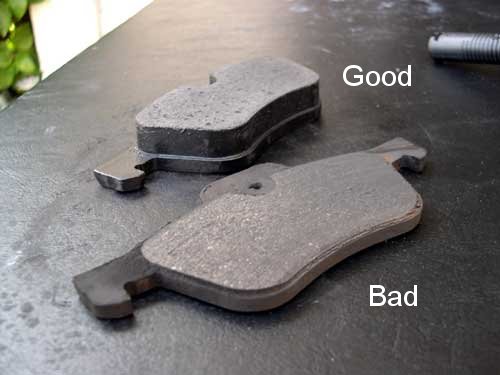
- Squeaking or squealing noises: A high-pitched noise when you apply the brakes is often a sign that your Honda Accord’s brake pads are worn down and need to be replaced. This noise is caused by the wear indicator on the pads, which is designed to make noise when the pads are getting low.
- Grinding or growling noises: If you hear a grinding or growling noise when you apply the brakes, it’s a sign that your Honda Accord’s brake pads are beyond the wear limit and need to be replaced immediately. Continuing to drive with worn brake pads can cause serious damage to your vehicle’s brake system.
- Reduced brake responsiveness: If you notice that your Honda Accord’s brakes don’t seem to respond as well as they used to, it could be a sign that your brake pads are worn down. This can result in longer stopping distances and reduced overall braking performance.
- Vibrations or pulsing: If you feel vibrations or pulsing in the brake pedal when you apply the brakes in your Honda Accord, it could be a sign that your brake pads are worn unevenly or are warped. This can cause reduced braking performance and even lead to brake failure if left untreated.
If you notice any of these signs, it’s important to have your Honda Accord’s brake pads inspected and replaced if necessary to ensure your vehicle’s safety and optimal performance.
Tools and Materials Needed to Replace Your Honda Accord (2008-2018) Brake Pads
Before you begin replacing your Honda Accord’s brake pads, it’s important to have the right tools and materials on hand. Here’s what you’ll need:
- New brake pads: Be sure to purchase brake pads that are designed specifically for your Honda Accord (2008-2018) model to ensure proper fit and performance.
- Brake caliper grease: This will help prevent squeaking and ensure smooth operation of the brake caliper.
- Brake cleaner: You’ll need this to clean the brake components and remove any dirt or debris that may have accumulated.
- C-clamp: This will be used to compress the brake caliper piston when replacing the brake pads.
- Lug wrench: You’ll need this to remove the lug nuts that secure the wheels to your Honda Accord.
- Jack and jack stands: You’ll need to jack up your Honda Accord to remove the wheels and access the brake components. Be sure to follow proper safety procedures when using a jack and jack stands.
- Torque wrench: You’ll need this to tighten the lug nuts to the proper torque specification.
- Screwdriver or pliers: You may need these to remove any retaining clips or hardware that secures the brake pads.
By having these tools and materials on hand, you’ll be prepared to replace your Honda Accord’s brake pads efficiently and effectively.
Steps to Remove the Old Brake Pads
Once you have the necessary tools and materials on hand, you can begin removing the old brake pads from your vehicle. Here’s how:
- Loosen the lug nuts: Before jacking up your car, use a lug wrench to slightly loosen the lug nuts on the wheel that you’ll be working on. This will make it easier to remove the lug nuts once the car is lifted.
- Jack up the car: Using a jack, lift the vehicle until the wheel is off the ground. Place jack stands under the car to provide additional support.
- Remove the wheel: Use the lug wrench to remove the lug nuts and take off the wheel.
- Remove the caliper: Locate the brake caliper, which will be mounted to the rotor with bolts or clips. Use a socket or wrench to remove these bolts and lift the caliper off of the rotor.
- Remove the old brake pads: Once the caliper is removed, you’ll be able to see the brake pads. If there are any retaining clips or hardware holding the pads in place, use a screwdriver or pliers to remove them. Then, simply slide the old brake pads out of the caliper.
By following these steps, you’ll be able to successfully remove the old brake pads from your vehicle. Remember to take your time and be careful not to damage any of the brake components during the removal process.
Inspecting the Brake Rotors for Wear and Damage
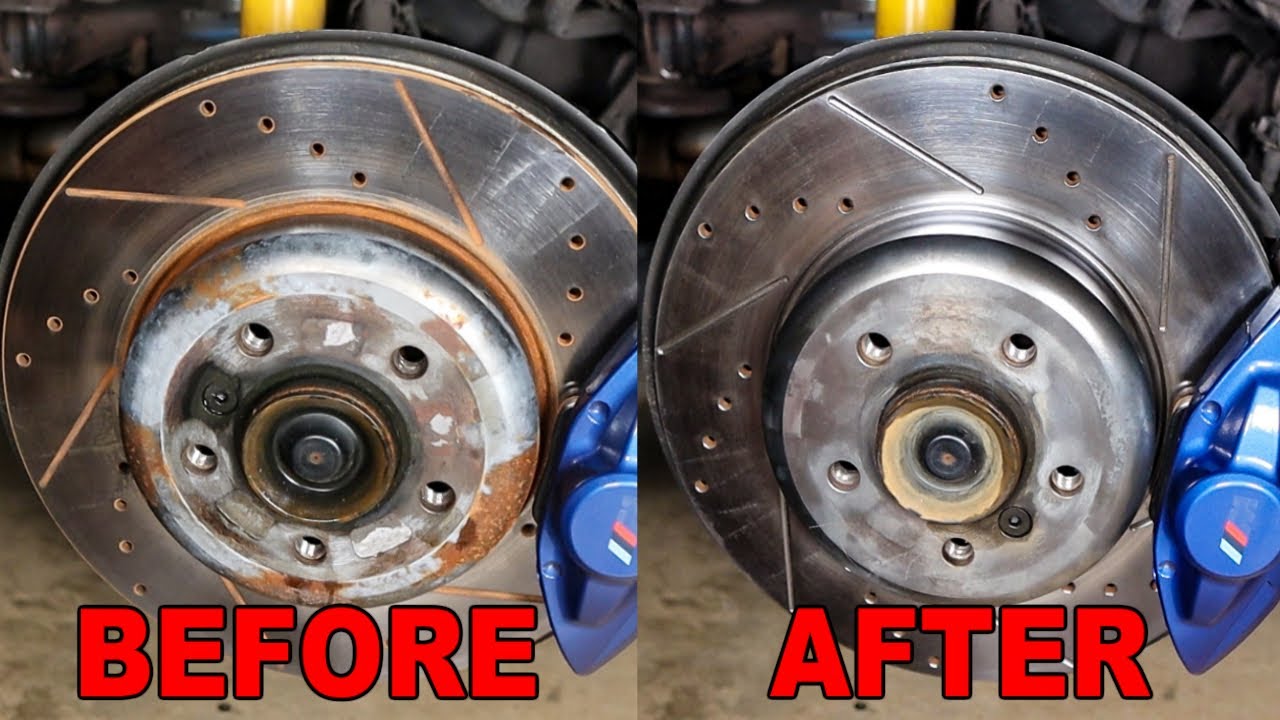
After removing the old brake pads, it’s important to inspect the brake rotors for wear and damage. The rotors are the shiny metal discs that the brake pads clamp down on to slow or stop the vehicle. Here’s how to inspect the brake rotors:
- Look for visible wear: Examine the surface of the brake rotor for any visible wear or damage, such as grooves, cracks, or deep scratches. If you can see any of these issues, it’s likely that the rotor will need to be replaced.
- Measure the thickness: Use a micrometer to measure the thickness of the brake rotor. Consult your vehicle’s owner manual or a repair manual to determine the minimum thickness specification for the rotors. If the rotor is too thin, it will need to be replaced.
- Check for warping: Set a dial indicator on the rotor’s surface and spin the rotor by hand. If the dial indicator moves more than a few thousandths of an inch, the rotor is likely warped and will need to be replaced.
Inspecting the brake rotors is an important step in the brake pad replacement process. If the rotors are worn or damaged, they can negatively affect the performance of your new brake pads and even cause them to wear out prematurely. By taking the time to inspect the rotors now, you’ll ensure that your brake system is working properly and your new brake pads will last as long as possible.
Installing the New Brake Pads on Your Honda Accord (2008-2018)
Now that you’ve inspected the brake rotors and confirmed they’re in good condition, it’s time to install the new brake pads. Here’s how to do it on your Honda Accord (2008-2018):
- Apply anti-seize lubricant: Apply a small amount of anti-seize lubricant to the back of each new brake pad. This will help prevent squeaking and ensure the smooth operation of the pads.
- Install the new brake pads: Insert the new brake pads into the caliper bracket, making sure they’re properly seated. You may need to use a brake pad spreader tool to push the caliper piston back into the caliper to make room for the thicker new pads.
- Reinstall the caliper: Place the caliper back onto the caliper bracket and reinstall the caliper bolts. Tighten the bolts to the manufacturer’s specifications using a torque wrench.
- Replace the retaining clips or springs: If your brake pads have retaining clips or springs, make sure to reinstall them in their original position.
- Repeat the process on the other side: Repeat steps 1-4 on the other side of your Honda Accord (2008-2018).
- Pump the brakes: Before driving your vehicle, pump the brakes several times to seat the new pads and restore proper brake pedal feel.
By following these steps, you’ll be able to successfully replace the brake pads on your Honda Accord (2008-2018). Remember, if you’re not comfortable performing this job yourself, it’s always best to take your vehicle to a qualified mechanic. Properly functioning brakes are crucial for the safety of you and your passengers, so it’s important to ensure they’re installed correctly.
Testing the Brakes on Your Honda Accord (2008-2018)
Once you’ve installed the new brake pads on your Honda Accord (2008-2018), it’s important to test the brakes before driving the vehicle. Here’s how to test your brakes to make sure they’re working properly:
- Start your engine: Start your car and let it idle for a few minutes to build up some pressure in the brake system.
- Check the brake pedal: Press the brake pedal several times to ensure it feels firm and doesn’t sink to the floor. If the pedal feels soft or spongy, there may be air in the brake lines and the system will need to be bled.
- Test the brakes at low speed: Drive your Honda Accord at a low speed (around 20 mph) and gently apply the brakes. Make sure the vehicle stops smoothly and doesn’t pull to one side or the other. If the vehicle pulls to one side, it may indicate a problem with the brakes or suspension.
- Test the brakes at higher speeds: Drive your Honda Accord (2008-2018) at a higher speed (around 50 mph) and apply the brakes more firmly. Make sure the vehicle comes to a smooth and controlled stop without any shaking or vibrations. If the vehicle shakes or vibrates, it may indicate warped brake rotors.
- Repeat the process: Repeat steps 3-4 several times to ensure the brakes are working properly.
By following these steps, you’ll be able to test the brakes on your Accord (2008-2018) and ensure they’re working properly. If you notice any issues during the testing process, it’s important to have your vehicle inspected by a qualified mechanic. Don’t take any chances with your brakes, as they’re one of the most important safety features on your vehicle.
Tips for Extending the Life of Your Brake Pads
Replacing your brake pads is an important maintenance task for any vehicle, but there are some things you can do to extend the life of your brake pads and avoid having to replace them as often. Here are some tips:
- Avoid hard stops: Hard stops can wear down your brake pads faster than normal. Try to anticipate stops and apply the brakes gradually instead of slamming on them.
- Avoid excessive braking: Try to avoid braking unnecessarily, such as when going down a hill. Instead, use engine braking to slow down the vehicle.
- Keep your distance: Keep a safe distance from the vehicle in front of you to avoid sudden stops and hard braking.
- Avoid heavy loads: Avoid carrying heavy loads in your vehicle, as this can put extra stress on the brakes and wear down the brake pads faster.
- Maintain your vehicle: Regular maintenance, such as brake inspections, can help identify and fix problems before they cause excessive wear on your brake pads.
- Use high-quality brake pads: Using high-quality brake pads can help them last longer and provide better braking performance.
By following these tips, you can extend the life of your brake pads and save money on replacement costs. Remember, your brakes are one of the most important safety features on your vehicle, so it’s important to keep them in good condition.
When to Seek Professional Help for Your Honda Accord (2008-2018) Brake Pads

While replacing your brake pads can be a DIY task, there are some situations where it’s best to seek professional help. Here are some instances where you should take your Honda Accord (2008-2018) to a professional mechanic:
- Unusual noises: If you hear any unusual noises coming from your brakes, such as grinding, squealing, or clicking, it’s a sign that something is wrong. It could be a problem with your brake pads, rotors, or calipers, and a professional mechanic can diagnose and fix the issue.
- Vibration or pulsation: If you feel a vibration or pulsation when you apply the brakes, it could be a sign of a warped rotor. A professional mechanic can inspect your brakes and determine if the rotors need to be resurfaced or replaced.
- Brake warning light: If the brake warning light on your dashboard comes on, it’s a sign that there is a problem with your braking system. A professional mechanic can use specialized equipment to diagnose the issue and fix it.
- Lack of confidence in your brakes: If you don’t feel confident in your vehicle’s braking performance, it’s always best to have a professional inspect your brakes. This is especially important if you’ve been experiencing any of the above issues.
Remember, your brakes are a critical safety feature on your Honda Accord (2008-2018), so it’s important to have them inspected and maintained regularly. If you’re unsure about your ability to replace your brake pads, or if you’re experiencing any of the above issues, it’s best to take your vehicle to a professional mechanic.